


Installing RVM on Ubuntu
One of the most interesting things about Ruby is how it handles different version of the language.
In Java, until now, nothing was removed, only deprecated. While this breaks nothing, makes the platform bloated, and keep the language tied, making impossible to introduce deep changes.
In PHP, basically authors don’t care about you: some stuff will be deprecated, others will just removed without previous mention, some stuff even will appear back in.
In Ruby, community has created some tools to make possible install several rubies at the same time. So, basically the language can evolve without break existing programs.
One of the most used tools to manage Ruby versions is RVM (Ruby Version Manager). Basically it just relies in a file configuration where you can state the desired Ruby version.
If the required version is installed, RVM will automatically switch to this version. If not installed, RVM will give you the command to install.
Simple and practical.
The usual way to install RVM is running a command line script: it’ll download RVM, extract it, run some configs and install it to the current user.
Some problems with this:
- no automatic updates: you’re required to manually run the update command;
- default configuration will install rubies and gems only to your user;
- if you try the global install, used folder (
/usr/local/rvm) is not the convention folder for this on Debian/Ubuntu; - you’ll need to run additional configurations manually.
So, if we have a dedicated package manager (apt), we can use it to properly install, configure and automatic updates.
With this idea in my mind, I’ve created a RVM package for Ubuntu (now a official RVM project) with the following features:
- stable
rvmis used; - rvm is installed using
mixed-modeinstall: usable by all users on the system, with isolated rubies/gemsets in user’s$HOME(see more here); - rvm is installed into
/usr/share/rvm(as Debian/Ubuntu convention); - all sudoers are automatic added to
rvmgroup at install; - all sudoers get local gemsets enabled;
Additionally automatic updates are provided by a Ubuntu PPA.
How about install it now?
Install
1. Add the PPA and install the package
Open a terminal (Ctrl+Alt+T) and run:
sudo apt-add-repository -y ppa:rael-gc/rvm
sudo apt-get update
sudo apt-get install rvm
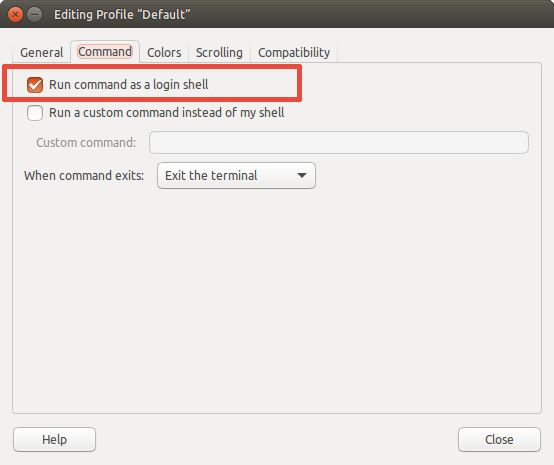
2. Change your terminal window
Now, in order to always load rvm, change the Gnome Terminal to always perform a login.
At terminal window, click Edit > Profile Preferences, click on Title and Command tab and check Run command as login shell.
3. Logout and login
A lot of changes were made (scripts that needs to be reloaded, you’re now member of rvm group) and in order to properly get all them working, you need to login and logout. This requires not only close terminal, but really logout and login again.
4. Install a ruby
Now you’re ready to install rubies. Open a terminal (Ctrl+Alt+T) and run:
rvm install ruby
RVM Usage
RVM complete instructions are available at RVM repository.
Additionally you can check manual pages too: open a Terminal (Ctrl+Alt+T) and run:
man rvm